Why Installation Quality Determines Long-Term Performance
You’ve specified the right geocell system. You’ve ordered the correct materials. Your project is ready to begin. Now comes the moment that determines whether your investment performs flawlessly for decades or fails within months: installation.
Here’s the reality that experienced contractors understand: geocell systems are remarkably forgiving of site conditions, but unforgiving of installation shortcuts. Proper installation isn’t complicated, but it requires attention to specific standards that differ from traditional paving or loose gravel placement.
A correctly installed BaseCore system handles heavy loads, prevents rutting, maintains drainage, and requires virtually no maintenance for 15-20 years. An improperly installed system—even with premium materials—can develop problems within the first season of use.
This guide provides the professional installation standards that ensure optimal performance. Whether you’re a contractor installing your first geocell project, a site supervisor overseeing installation, or a facility manager verifying quality work, you’ll find the critical specifications and techniques that separate excellent installations from problematic ones.
Understanding Geocell Installation Requirements
Before diving into procedures, let’s clarify what makes geocell installation distinct from other ground stabilization methods. The process occupies a middle ground between traditional approaches. It’s more structured than simply spreading gravel, but far simpler than asphalt paving.
Unlike loose gravel, you’re creating a confined cellular structure that must maintain its geometry under load. Panel connections, edge treatments, and proper infill compaction within cells are critical. Skip these steps and you’ve essentially created expensive loose gravel that will fail just as quickly as the conventional approach.
Unlike paving, you don’t need specialized equipment, temperature management, or complex curing procedures. Standard site work equipment handles the entire installation. The surface remains permeable and workable, allowing adjustments even after installation.
The critical factor is this: the three-dimensional honeycomb structure only delivers its engineering benefits when properly expanded, connected, filled, and compacted. Each cell must maintain its shape and confinement. This requires specific techniques that professional installers master quickly but that differ meaningfully from other site work.
Site Preparation and Subgrade Preparation Standards
The foundation determines everything that follows. Invest time in proper site preparation and the rest of the installation proceeds smoothly. Rush through this phase and problems compound through every subsequent step.
Calculating Excavation Depth
Calculate your total excavation depth based on your complete system buildup. For a typical 6-inch BaseCore system with 6-inch aggregate base, you’ll excavate approximately 13-14 inches below final grade. The formula is straightforward: BaseCore height plus 1-2 inches of overfill plus your base course thickness. Adjust based on your specific conditions—poor soil requires deeper excavation and thicker base, while stable soil on level sites might need minimal base course.
Grade the excavated area to achieve proper drainage slope. Minimum 2% slope is essential—that’s 2 feet of elevation change per 100 feet of length, or roughly 1/4 inch per foot. You can increase to 5% for better drainage in areas with heavy rainfall, but don’t exceed this without careful consideration of usability for vehicles and pedestrians.
The prepared subgrade should not vary more than 1/8 inch in any 10-foot measurement. Use a 10-foot straightedge to verify smoothness. Low spots collect water and create weak areas that telegraph through the finished surface. High spots prevent proper panel contact with the base and create voids that allow settlement.
Achieving Proper Subgrade Compaction
Loose, uncompacted subgrade will consolidate under load, causing settlement even with a perfect geocell installation above it. Professional installations achieve 95% Modified Proctor density for the subgrade using the AASHTO T-180 standard. This industry-standard specification ensures adequate bearing capacity for the layers above.
Compact in lifts if you’re bringing in fill material. Each lift should be 8-12 inches loose thickness, which compacts down to 6-8 inches, with thorough compaction before adding the next lift. For existing native subgrade, verify compaction with a soil density test if the project scope warrants the expense. On smaller projects, visual inspection and physical testing with a hand probe provides adequate verification.
Equipment selection matters for subgrade compaction. Vibratory plate compactors work for smaller areas under 5,000 square feet. Vibratory rollers handle larger areas far more efficiently. Vibratory sheepsfoot rollers work best for cohesive clay soils. Make multiple passes—typically 4-6 passes achieve target density in granular materials, while clay soils may require more.
Managing Drainage During Site Preparation
Water is the enemy of any pavement system. Address drainage during site preparation, not as an afterthought when problems appear. Observe water flow patterns during and after rain if possible. Where does water currently go? Identify low spots where water would collect and eliminate them through regrading. Plan how water will exit the site—toward landscaped areas, storm drains, or designed drainage features.
For larger installations, consider perimeter drainage swales or catch basins if the site will concentrate water flow. While BaseCore’s high permeability eliminates most drainage infrastructure needs compared to impervious paving, you still need to manage the volume of water that percolates through the system and into the subgrade below.
Mark locations of underground utilities before excavation. Coordinate with utility locate services in your area. Document locations photographically so future maintenance or expansion doesn’t encounter surprises that damage utilities or delay work.
Installing Base Course and Geotextile Fabric
With subgrade prepared, you’re ready to install the separation layer and aggregate base that create the stable platform for your geocell system. These components prevent subgrade contamination of your aggregate and provide uniform support for the panels above.
Geotextile Fabric Specifications and Placement
The specification for BaseCore installations calls for 6-12 oz non-woven geotextile fabric depending on your application. Lighter applications using 2-4 inch cells with passenger vehicles only can use 6 oz fabric. Heavy-duty applications with 6-8 inch cells handling truck traffic should use 8-12 oz fabric for adequate separation strength.
Roll the geotextile across your prepared subgrade in the longest practical runs to minimize seams. When seams are necessary, overlap adjacent rolls by at least 12 inches. This prevents gaps that would allow subgrade soil to contaminate your aggregate base over time. Secure the fabric temporarily with landscape staples or pins, especially in windy conditions. Don’t pull it tight—allow some slack so it conforms to minor subgrade irregularities without tearing during base placement.
Non-woven geotextiles provide superior drainage characteristics compared to woven alternatives while still delivering excellent separation between soil layers. The needle-punched structure allows water to pass through freely while preventing soil migration upward into the aggregate.
Aggregate Base Course Installation and Compaction
The base course serves two critical functions in your installation. First, it distributes loads from the geocell system above to the broader subgrade below, preventing point loads from creating settlement. Second, it provides a smooth, stable surface for panel placement that ensures cells maintain proper contact with their foundation.
Material specification calls for well-graded crushed aggregate, typically 3/4-inch minus or similar gradation. The gradation should include a range of particle sizes from 3/4 inch down through fines. This gradation compacts well and provides excellent stability. Avoid single-sized aggregates that don’t interlock properly.
Thickness requirements vary by application. Light-duty applications serving passenger cars and residential use need 4-6 inches of compacted base. Medium-duty applications with mixed traffic in commercial settings require 6-8 inches compacted. Heavy-duty applications supporting loaded trucks and industrial traffic demand 8-12 inches of compacted base course.
Place base course in lifts if your total thickness exceeds 8 inches. Each lift should be 6-8 inches loose thickness, spread evenly, then compacted before adding the next lift. This ensures uniform density throughout the base rather than dense material at the surface with loose material below.
Compaction targets for base course are higher than subgrade requirements. Achieve 98-100% Modified Proctor density for load-bearing applications. This high compaction standard is not excessive—it’s necessary for proper performance. Use a vibratory roller weighing minimum 3 tons for efficient compaction on larger projects, or a vibratory plate compactor on smaller areas.
Make at least 4-6 passes with your compaction equipment. Apply water lightly during compaction to achieve optimum moisture content. The aggregate should hold together when squeezed but not be saturated. Too dry and you won’t achieve proper density. Too wet and you create a muddy surface that’s difficult to compact and takes time to dry.
After compaction, verify the base course surface using your 10-foot straightedge. The surface should not vary more than 1/8 inch in 10 feet. This smooth, uniform surface allows proper panel installation in the next phase. Any irregularities here telegraph through the finished geocell surface.
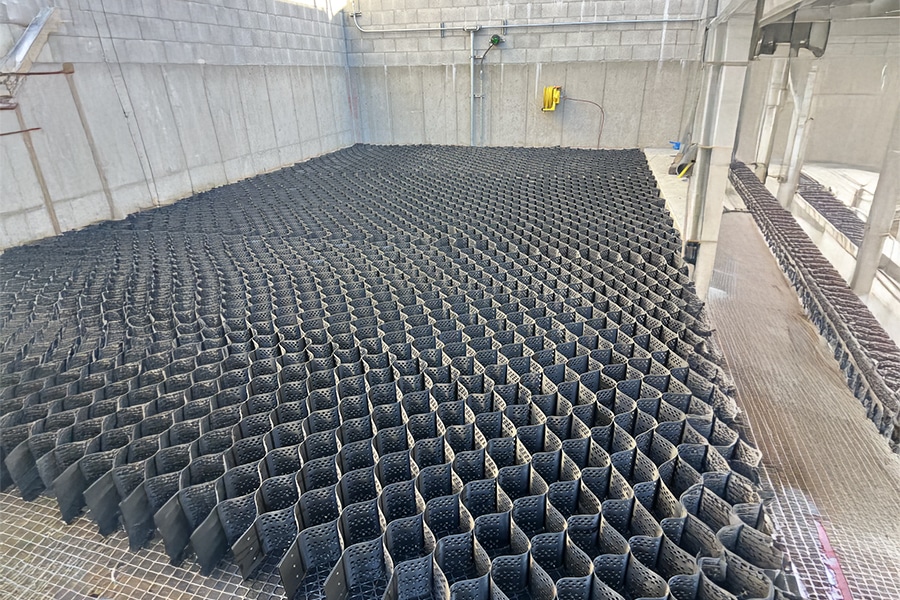
Expanding and Connecting BaseCore Panels
Now comes the phase that distinguishes geocell installation from other methods. Proper panel handling and connection ensure the system maintains its structural integrity under load. This phase moves quickly once you understand the techniques, but attention to detail prevents problems.
Panel Expansion Techniques
BaseCore panels ship collapsed flat to minimize freight volume and reduce shipping costs. On-site, you’ll expand them into their three-dimensional honeycomb shape. This requires some force, especially in cooler weather when HDPE material is less flexible. Plan for a minimum of two people per panel during expansion.
One person holds the panel edge while the other pulls to full expansion. Work systematically from one end of the panel to the other rather than trying to expand the entire panel at once. Pull until all cells reach their designed height and the panel lies flat without buckled or collapsed sections. The panel should expand to its full dimensions—typically 10×12, 10×20, or 9×18 feet depending on the panel size you ordered.
Temperature affects expansion effort significantly. Warmer weather above 60°F makes expansion easier as the material is more flexible. In cooler weather, panels require more force to expand fully. Don’t compromise by accepting partially expanded panels—they don’t perform correctly and will fail prematurely under load.
Connecting Panels with BaseClips
BaseCore panels connect using BaseClips—the proprietary connection system that locks adjacent panels together. Proper connection is essential because connected panels distribute loads across multiple cells rather than concentrating stress at panel edges where failures typically initiate.
Connect panels as you expand them, working across your installation area systematically. Insert BaseClips at connection points following the spacing recommended in your installation guide—typically every 2-3 feet along panel edges. The clips should snap firmly into place. If connection feels loose or clips don’t seat properly, verify you’re aligning panel edges correctly.
The connection system is designed for field installation without tools, but it does require panels to be properly oriented to each other. Take a moment to understand the connection mechanism before starting so you don’t force clips incorrectly and damage the connection points.
Here’s a critical restriction during this phase: do not walk on expanded panels before they’re filled with infill material. The unsupported HDPE will flex and potentially deform under your weight, damaging cell walls or panel connections. Walk on adjacent filled panels or on the base course between panels during installation.
Understanding When Staking Is Necessary
On level applications, staking is typically optional—the weight of infill material holds panels in position adequately. However, consider staking for slopes exceeding 3:1 grade (33% slope), areas with expected high water flow across the surface, and perimeter panels before interior panels are installed and filled.
Use 1/2-inch rebar stakes, 8-12 inches long for level applications, or 18-24 inches long for slopes. Drive stakes through cell walls at strategic points, leaving the top of the stake below the cell height so it doesn’t interfere with infill placement. Once cells are filled, stakes can be removed and reused on subsequent sections, or left in place permanently.
Filling and Compacting Geocells Properly
This phase determines whether your installation achieves its design performance. Proper infill placement and compaction lock the geocell system together and create the load-bearing surface. Understanding the correct sequence is absolutely essential.
The Critical Fill-Then-Compact Sequence
Here’s the most important concept in geocell installation: geocells must be completely filled before any compaction occurs. This is fundamentally different from traditional base course construction where you compact in lifts. You cannot compact geocells in lifts. You cannot drive equipment over unfilled or partially filled cells.
The three-dimensional cell structure requires the confining walls to be supported by infill material throughout their height. Driving equipment over empty or partially filled cells collapses the cell walls, damages panel connections, and destroys the structural integrity of the system. Professional installers understand this restriction and plan material placement accordingly.
Selecting and Placing Infill Material
The recommended infill for most load-bearing applications is #57 crushed angular stone with 15-20% fines. This specification delivers optimal results for several reasons. The angular shape locks particles together within cells, creating a stable matrix that resists movement under traffic. Round materials like pea gravel shift under load—never use rounded stone in geocells for load-bearing applications.
The 15-20% fines content (material passing the #200 sieve) fills voids between larger stones, improving compaction and creating a smoother final surface. Completely washed stone lacks these fines and doesn’t compact as well. The combination of angular stone and appropriate fines creates the ideal infill matrix.
Place infill using a skid steer, wheel loader, or dump truck for larger areas. Keep drop height under 3 feet (1 meter) to avoid damaging cell walls from impact. For smaller projects, wheelbarrows and shovels work fine. Distribute infill evenly across cells rather than dumping in piles that you then spread, which speeds the process and ensures uniform filling.
The critical specification for filling is this: fill all cells 1-2 inches above the top of the cell walls before compaction. This overfill is essential—don’t skip it or reduce it. The material will compact down to flush with or slightly above the cell tops, creating the proper final surface. Work systematically across the installation area, filling sections completely before moving to the next area. Don’t leave any cells partially filled.
Equipment must stay off unfilled areas during this phase. Never drive heavy equipment over unfilled or partially filled geocells. Fill from the edges working inward, or work from already-filled sections adjacent to the area being filled. Plan your material delivery and placement sequence to maintain access without driving over unfilled panels.
Compaction Equipment and Standards
Once an entire section of cells is completely filled with the proper 1-2 inch overfill, you’re ready to compact. Not before. The equipment requirement is straightforward: minimum 3-ton vibratory roller for proper compaction. Walk-behind plate compactors work for small projects under 2,000 square feet, but vibratory rollers are far more efficient and effective for anything larger.
Vibratory rollers are strongly preferred over static rollers for geocell infill compaction. The vibration reduces friction between aggregate particles, allowing them to settle into optimal dense configuration. Typical vibratory rollers for this work weigh 4-8 tons operating weight with frequencies of 2,400-3,000 vibrations per minute. Larger rollers up to 10-12 tons can be used on heavy-duty applications, but be cautious about over-compaction near edges.
Begin compaction on completely filled sections. The filled and compacted geocells provide a stable working platform for equipment. Continue filling adjacent sections and compact as you go, maintaining a systematic progression across the site.
Proper Compaction Technique
Water application improves compaction results significantly. Lightly moisten the infill during compaction to achieve optimum moisture content. The stone should hold together when squeezed but not be saturated. Apply water with a hose or water truck before and during compaction. In hot, dry conditions, you may need to apply water multiple times as the stone dries.
Make a minimum of 3-4 passes with your vibratory roller over each section. The first pass is typically done with vibration off (static mode) to initially settle the material without risk of over-compaction at edges. Subsequent passes use full vibration to achieve target density. More passes may be needed to achieve adequate firmness, especially with deeper cells or less-than-ideal infill material.
Maintain 2-4 mph (3-6 km/h) roller speed during compaction. Slower speeds provide more impacts per foot of travel, improving compaction effectiveness. Don’t rush this phase by running the roller too fast to save time—proper compaction now prevents problems for years.
Target density for the infill material is 95% Modified Proctor minimum. This ensures the confined aggregate performs as an integrated structural system with the geocell walls. Each roller pass should overlap the previous pass by approximately 6 inches to ensure uniform compaction across the entire surface without missed strips.
Exercise caution when compacting within 3 feet of unsupported panel edges or perimeter cells that don’t have adjacent filled cells. Excessive compaction force can cause lateral displacement of panels. Use lighter equipment or hand tampers for these edge areas if you notice any panel movement during compaction.
Verifying Final Surface Quality
After compaction, the infill surface should be flush with or up to 1/2 inch above the top of cell walls. The 1-2 inch overfill you started with compacts down to this final height. If the surface is below the cell tops after compaction, add more infill and recompact. Don’t leave cells partially filled or accept low spots that will collect water.
Check surface smoothness using your straightedge. The compacted surface should not vary more than 1/4 inch in 10 feet for pedestrian and passenger vehicle applications. Heavy-duty industrial applications can tolerate slightly more variation, but maintain the smoothest possible surface for best performance and user comfort.
Address any low spots immediately by adding more infill material and recompacting locally. Don’t leave depressions that will collect water and create weak points. Similarly, if sections are significantly higher than adjacent areas, remove excess material before final compaction. You want a uniform surface without abrupt elevation changes that create uncomfortable driving conditions.
Completing Edge Treatment and Final Grading
The edges define your installation boundaries and prevent lateral spreading of the geocell system over time. Proper edge treatment is the final step that completes a professional installation and determines long-term appearance.
Selecting the Right Edge Restraint Approach
You have four proven approaches for edge treatment, each suited to different budgets, aesthetics, and performance requirements. Flush excavation provides invisible edges by making the geocell system level with surrounding grade. Excavate slightly beyond your geocell area and install panels flush with adjacent surfaces. This works beautifully for installations adjoining grass or landscaping where you want seamless integration. It’s the most economical option with no additional materials required beyond slightly more excavation.
Pressure-treated wood borders offer good value and natural appearance suitable for many commercial and residential applications. Use 6×6 or 4×6 timbers staked securely into the subgrade. Drive 1/2-inch rebar stakes through pre-drilled holes in the timbers, spacing stakes every 4-6 feet. Wood provides 10-15 years of service and typically costs $2-5 per linear foot installed.
Corten steel edging from BaseCore delivers modern aesthetics with exceptional durability for higher-end installations. The weathered steel appearance adds visual interest while providing permanent edge containment that will last indefinitely. Corten steel installation follows manufacturer guidelines for proper staking and overlap at joints. Higher initial cost but zero maintenance and permanent performance.
Concrete curbs represent maximum permanence and work well integrating with existing hardscape or creating professional boundaries in commercial settings. Install concrete curbs before or concurrent with geocell installation, allowing adequate curing time if poured on-site. Concrete creates clean, professional boundaries and stands up to vehicle impacts in high-traffic areas better than any other option.
Final Surface Preparation
With edges secured and infill properly compacted, complete your installation with final surface attention. Run your roller over the entire surface one final time to address any settling from edge installation work or minor irregularities you notice during final inspection. Add small amounts of infill to any areas that settled below the desired final height during edge work.
Sweep or blow off any loose infill material from the surface. The goal is a clean, uniform appearance with all infill contained within cells and no loose stone on top that can be kicked up by traffic or tracked into adjacent areas.
Verify drainage flow one more time before releasing the installation to traffic. Water should sheet across the surface and percolate through quickly, or flow off edges as designed. Standing water anywhere indicates a low spot that needs correction before vehicles use the surface and compact it further.
Quality Control and Common Installation Issues
Professional installers conduct regular quality checks during installation rather than waiting until completion to discover problems that are expensive to correct.
Critical Inspection Points
After subgrade preparation, verify 95% compaction using nuclear density gauge or other testing method on critical projects where performance is essential or specifications require documentation. Check smoothness with your 10-foot straightedge—no variations exceeding 1/8 inch. Confirm proper drainage slope with a builder’s level or laser level. Document any deviations from plan and corrective actions taken with photographs that protect you if questions arise later.
After base course installation, test compaction to verify you’ve achieved the 98-100% Modified Proctor density target. Core samples on critical projects confirm proper depth and density throughout. Check surface smoothness using the same 1/8-inch in 10-feet standard. Ensure geotextile is properly overlapped with no gaps or tears that would allow contamination.
During panel installation, verify all panels are fully expanded with no collapsed or partially expanded cells that compromise performance. Check BaseClip connections to confirm all adjacent panels are firmly connected. Confirm panels lie flat against base course without bridging or gaps underneath that prevent proper load transfer. Document that panel layout matches the approved plan.
After infill and compaction, verify infill is flush with or slightly above cell tops throughout the installation. Check surface smoothness—1/4 inch variation maximum in 10 feet for most applications. Test compaction on representative areas to confirm 95% minimum density. Confirm no voids or unconsolidated areas remain that will settle under traffic.
Final inspection ensures edge treatments are secure and properly installed per specifications. Verify the surface is clean and uniform in appearance without loose material. Confirm drainage is functioning as designed with no standing water. Verify the installation matches approved plans and specifications in all respects.
Preventing Common Installation Problems
Understanding what can go wrong helps you prevent problems rather than repairing them after they occur. Partially expanded panels result from insufficient force during expansion, often in cold weather. The impact is reduced load capacity and premature failure under traffic. Prevention requires ensuring complete expansion before connecting panels, adding workers if needed to apply adequate force.
Inadequate infill compaction stems from too few roller passes, roller speed too fast, or no moisture added during compaction. The impact is settlement under traffic, rutting, and premature wear. Prevention requires the minimum 3-4 passes at proper speed with moisture application as needed for conditions.
Insufficient base preparation from skipped compaction steps, inadequate thickness, or poor drainage causes the entire system to settle prematurely. This requires complete reconstruction to correct. Prevention demands following base course specifications exactly and verifying quality with testing.
Poor panel connections from misaligned panels or missing BaseClips allow panels to separate under load, creating surface irregularities. Prevention requires systematic connection as panels are installed with verification that all connections are secure.
Inadequate edge restraint or missing edge treatment entirely allows lateral spreading and loss of system geometry. Prevention means choosing an appropriate edge method for your application and installing it per specifications before releasing the surface to traffic.
Real Installation Experience from Professional Contractors
Case studies from actual projects illustrate proper techniques and common challenges that professionals encounter and overcome.
First-Time Contractor Success Story
A site contractor in North Carolina took on their first BaseCore project: a 12,000 square foot office building parking lot. The company had decades of experience with traditional site work but had never installed geocells. What made them successful was their approach to learning the system.
The contractor contacted BaseCore’s project manager before starting and reviewed the installation guide thoroughly with their crew. They conducted a pre-installation meeting to walk through the process before materials arrived, ensuring everyone understood the sequence and critical requirements.
They allocated adequate time for base preparation, spending three full days on subgrade grading and base course installation instead of rushing to get to the geocell phase. This patience paid off—the base was perfect, providing an ideal foundation for the geocell system that installed quickly and easily.
Panel installation took 1.5 days with their four-person crew—slower than an experienced crew but respectable for first-timers learning the connection system. They called BaseCore’s project manager twice with questions during installation. Both questions about panel connection technique and proper infill height were answered quickly, preventing errors that would have required correction.
The parking lot has performed flawlessly for three years since installation with zero maintenance required. The contractor now includes BaseCore in proposals routinely and their installation speed has increased to 10,000 square feet per day with their experienced crew. First-time installers who follow the installation guide, ask questions when uncertain, and don’t rush the process achieve excellent results.
Heavy-Duty Application Compaction Challenge
A contractor installing a 40,000 square foot contractor yard in Texas encountered challenging clay subgrade. The project required 8-inch BaseCore with heavy-duty specifications for loaded dump trucks and equipment staging. Initial compaction attempts using a 3-ton roller weren’t achieving adequate density in the 8-inch infill depth despite multiple passes.
The contractor recognized the problem when they could see the surface wasn’t firming up properly. Rather than accepting inadequate compaction and moving forward, they paused to adjust their approach. They upgraded to a 7-ton vibratory roller which provided significantly more compactive force appropriate for the deeper cell depth and heavier application.
They also increased water application during compaction, achieving better moisture content for optimum density. The final compaction testing showed 96% density throughout the installation. The yard has handled constant heavy truck traffic for five years without any settlement or rutting, demonstrating that proper compaction technique saves months of potential repair work.
The key lesson is that heavier applications demand appropriate equipment and technique. When standard approaches aren’t achieving results, pause and adjust rather than accepting inadequate compaction that will cause problems later.
Adapting Edge Treatment to Site Conditions
A church in Georgia installed a 15,000 square foot overflow parking area with grass-reinforced BaseCore for aesthetic appeal during non-event periods. Their contractor initially planned flush excavation for edges to maintain the natural look of the lawn transitioning into parking.
During site evaluation, the contractor realized the parking area sat slightly lower than adjacent lawn areas. Flush excavation would create a bowl effect that collected water during Georgia’s heavy rains, creating drainage problems and potentially damaging the grass infill. Rather than proceeding with the original plan, they adapted the approach.
They installed pressure-treated wood edging that elevated the parking area approximately 4 inches above surrounding grade. This required slightly more excavation but provided positive drainage away from the parking surface. The wood borders also created a clear visual boundary between the parking area and lawn, helping prevent vehicles from driving onto landscaped areas during large events when the lot fills completely.
The installation drains perfectly even during heavy summer thunderstorms. The wood borders weathered naturally within months to blend with the landscape aesthetic the church wanted. Field conditions sometimes require adaptation from original plans, and experienced contractors recognize when adjustments improve performance.
Installation Best Practices Summary
Professional installations follow proven practices that ensure quality and efficiency across all project types and sizes. Site preparation is not negotiable or something to shortcut for schedule. Proper subgrade grading, adequate base thickness, and thorough compaction create the foundation that determines long-term performance.
Follow specifications exactly as provided. Geotextile weight, base course thickness, and compaction standards aren’t suggestions—they’re engineered requirements that ensure performance. Deviating to save money or time creates problems that cost far more to fix.
Never skip the overfill before compaction. That 1-2 inches of extra infill above cell tops seems wasteful until you understand it’s necessary for proper compaction and achieving the correct final surface height. Insufficient overfill leaves you with low spots after compaction.
Use adequate compaction equipment matched to your project scope. A walk-behind plate compactor on a 20,000 square foot parking lot won’t achieve proper results no matter how many passes you make. Match equipment capability to project requirements.
Make enough roller passes to achieve proper density. Three to four passes minimum, more if you’re not achieving adequate firmness. Don’t rush compaction to save 30 minutes and create problems that last years.
Verify quality at each phase rather than waiting until completion. Catch problems early when they’re easy to fix. Discovering issues after the entire installation is complete means expensive corrections that could have been prevented.
Ask questions when uncertain about any aspect of installation. Your BaseCore project manager remains available throughout installation to prevent costly mistakes. A quick phone call provides clarity that prevents errors.
Document the installation with photographs at each phase. These provide valuable records for warranty purposes and future reference if questions arise about specifications or procedures followed.
Conclusion: Installation Quality Equals Long-Term Performance
The difference between a BaseCore installation that performs flawlessly for decades and one that develops problems within months comes down to installation quality. The materials are engineered for demanding applications. The design is proven across thousands of projects worldwide. But the installation must follow professional standards to deliver that proven performance.
Every phase matters in the sequence. Proper site preparation creates the foundation. Correct base course and geotextile installation provide the stable platform. Careful panel expansion and connection establish the three-dimensional structure. Thorough infill placement and compaction lock the system together. And appropriate edge treatment completes the professional installation.
These standards aren’t difficult to achieve. They don’t require specialized skills or exotic equipment. They simply require attention to specifications, proper technique, and refusal to accept shortcuts that compromise quality for minor schedule or cost savings.
Contractors who follow these professional installation standards consistently deliver projects that exceed client expectations and require virtually no maintenance. That reputation leads to repeat business and referrals—the foundation of successful contracting companies.
Facility managers and project owners who understand these standards can effectively evaluate contractor proposals and verify quality work. You’ll know what questions to ask, what to inspect, and what constitutes acceptable versus excellent installation quality.
Whether you’re installing your first BaseCore project or your hundredth, these standards ensure you achieve the performance the system was engineered to deliver. Follow them, and your installation will still be performing flawlessly when you’re ready to expand or replicate the success on your next project. Ready to start your professional installation? Contact the BaseCore team for installation support, technical guidance, and answers to project-specific questions. Our project managers remain available throughout your installation to ensure success.